All Terrain Mover Trouble Shooting

We’re sorry to hear you have encountered an issue. The purchase of an All Terrain Mover comes with lifetime support so rest assured we will help get you moving again.

Before you start
  1. Before turning the mover on, ensure it is fully charged. Plug the charger into the mover – the LED indicator light on the charger will turn green once the battery is fully charged. Even if the mover display states 100%, please keep charging until the light on the charger is green. Please do not leave it on charge overnight.
    You can charge the battery in the mover by plugging the charger directly into the back of the machine, or you can remove the battery from the machine and charge it separately.
  2. Once you have finished using the mover, recharge the battery and store it with a full charge. This is very important for battery health.
  1. Turn on the remote control using the centre on/off switch on the remote.
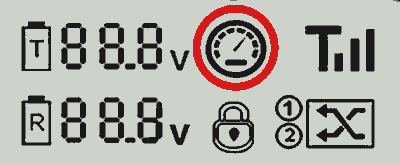
  2. Before turning on the mover, ensure cruise control is disabled on the remote control. If the symbol below is visible on the remote control display, cruise control is enabled. Press the button on the rear of the remote to disable cruise control.
    All Terrain Mover remote display – cruise control symbol
  3. Ensure the emergency stop button on the mover is released – twist it to the right to release.
  4. Press and hold the On button. The blue LED lights on the side of the mover will come on and then change to a different shade of blue. As soon as the colour changes, release the On button. If you continue holding the On button, the mover will turn off again.
  5. You are now able to operate the mover with the joystick on the remote control.

Trouble Shooting

Please check each of the following in order:
  1. Ensure the emergency stop button is released – twist it to the right to release. If the emergency stop button won’t release, please email info@optitec.com.au.
  2. With the charger plugged into the mover, check that the LED light on the charger has turned green.
  3. If the mover is still not turning on, remove the battery (remove the rear cover – the end with the emergency stop button – and slide the battery out) and put the battery on charge directly until the LED light on the charger turns green.
  4. When you re-insert the battery, ensure it is seated correctly – it needs to be pushed all the way in.
  5. If the mover is still not powering on, please email info@optitec.com.au with the following information to help us best diagnose and quickly resolve the issue:
    1. What colour is the LED light on the charger?
    2. When you hold the On button down, what shows up on the display screen? Do the side lights on the mover come on at all?
    3. With the battery removed from the mover, press the black button on the right side of the battery. What shows up on the display?
    4. Ideally, a short video showing what happens when you try to turn the mover on.
  1. Ensure the power cable is securely plugged into the wall socket and into the charging block.
  2. Ensure the charge cable is connected to the mover correctly.
  3. Try charging the battery outside of the mover. Remove the rear cover (the end with the emergency stop button) and slide the battery out. Connect the charger and monitor whether it charges.
  4. Try charging with the mover turned on. If this works, please email info@optitec.com.au.
  5. If the mover is still not charging, please email info@optitec.com.au.
  1. Give the mover a full charge to reset it. Plug the mover into the charger and wait until the red light on the charger turns green. If this is a display issue, this charge will recalibrate the battery reading and can take longer than a normal charge – up to a few hours.
  2. If this still persists, check and update the battery settings. The battery setting should be 016. Follow the instructions in the video below.

  3. If this still persists, please email info@optitec.com.au.
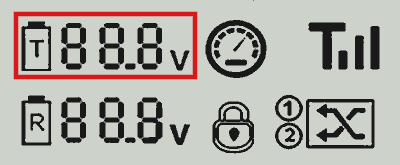
  1. Ensure the remote control is charged above 3.7V – it is fully charged at 4.2V. The remote control’s charge is shown in the top left corner of the remote display (highlighted below).
    All Terrain Mover remote display – remote charge reading highlighted
  2. Ensure the remote control and the mover are both turned on.
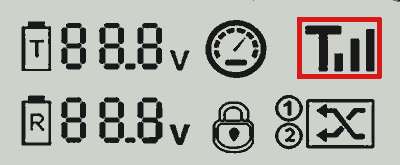
  3. Check that the signal bars in the top right corner of the remote display are showing (highlighted below). If they are not showing, follow the steps in the video below to re-pair the remote control with the mover.
    All Terrain Mover remote display – signal bars highlighted

  4. If the mover is still not responding, please email info@optitec.com.au.
  1. Ensure cruise control is disabled on the remote control. If the symbol below is visible on the remote control display, cruise control is enabled. Press the button on the rear of the remote to disable cruise control.
    All Terrain Mover remote display – cruise control symbol
  2. If the mover is turning on the spot when the remote control is powered on, the remote needs to be recalibrated. This is a quick and easy process outlined in the video below.

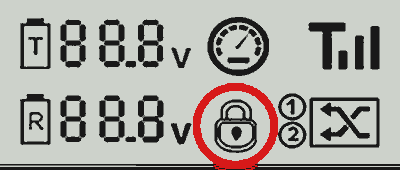
  3. Once the recalibration is complete, turn the remote control off. Then hold down the 6 button and turn the remote control back on. The padlock icon should appear on the screen. This locks the programming buttons to prevent accidental reprogramming.
    All Terrain Mover remote display – padlock icon
  4. If recalibration does not solve the issue, please email info@optitec.com.au.

Please take a short video of what is happening and email it to info@optitec.com.au.

With heavy trailers on certain coarse, hard surfaces, spinning on the spot may cause the tracks to start shifting to the side.

  1. If this happens, turn the mover back the other way, then drive the mover forward and back a small distance and the tracks will re-align.
  2. The mover operates more effectively when you turn whilst moving, as this minimises the pressure on the tracks. We recommend turning whilst moving rather than spinning on the spot.

Still need help?

If you have reviewed all of the above and the problem persists, please email info@optitec.com.au. Including a short video of the issue helps us diagnose it quickly.